Setting up an eSIM on the iPhone Air is a simple and modern way to activate cellular service without the need for a physical SIM card. This post will show you how to set up eSIM on the iPhone Air and transfer your phone number to another iPhone.

How to set up an eSIM on your iPhone Air
To set up an eSIM on iPhone Air, there are three main methods available: carrier activation, QR code setup, and manual installation.
The iPhone Air is eSIM-only, so all carrier plans must be installed digitally via these processes.
Method 1: Configure eSIM during initial iPhone setup
If your carrier has previously assigned an eSIM to your account or iPhone purchase, it will be activated when you first connect your device.
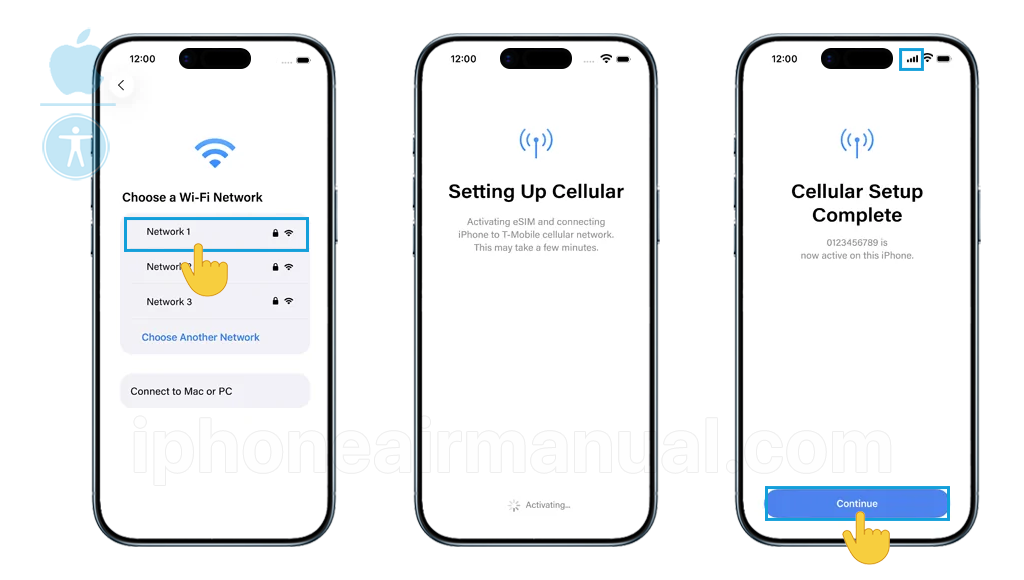
Follow the on-screen instructions to connect to Wi-Fi and sign in with your Apple account. Once cellular activation is complete, signal strength bars will appear in the upper-right corner.
This process normally takes a few minutes. Then, you may complete configuring your device and begin accessing cellular data via your eSIM.
Method 2: Set Up eSIM After Setup (QR Code Method)
Most carriers supply a QR code for eSIM setup:
- Open the Settings app, then tap “Cellular” (or “Mobile Data”).
- Tap “Add eSIM” or “Add Cellular Plan.”
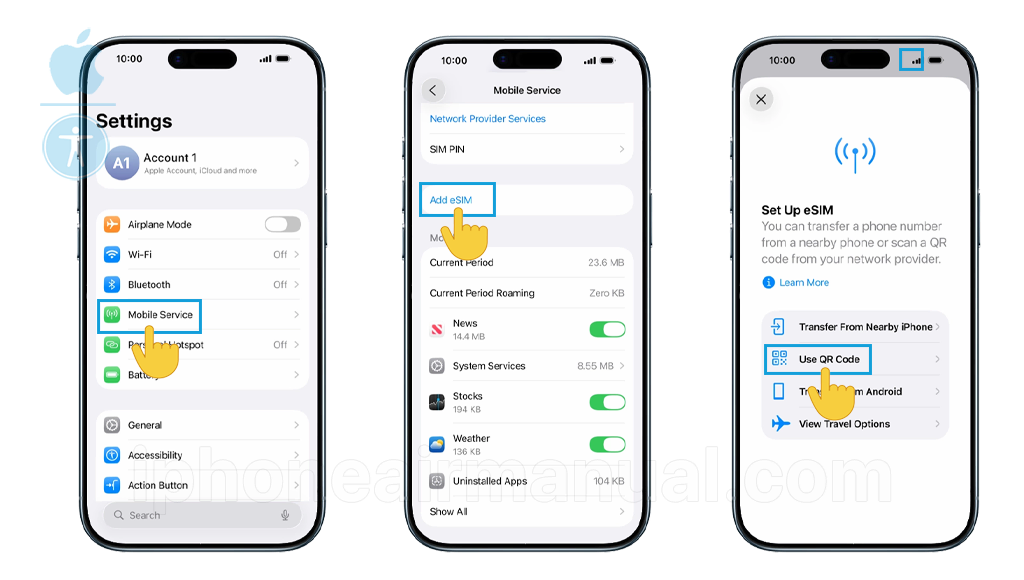
- Select “Use QR Code” and scan the eSIM QR code received from the carrier, either printed or displayed on another device.
- Tap “Continue” and then “Add Cellular Plan” to confirm.
- Some providers may require a short confirmation code; just enter it if prompted.
Method 3: Adding and Set Up eSIM by Entering Details Manually
If you don’t have access to a QR code, you can manually enter the eSIM activation details. This method requires specific information from your carrier:
- Open Settings on your iPhone Air.
- Tap “Cellular” or “Mobile Data,” depending on your region.
- Select “Add Cellular Plan.”
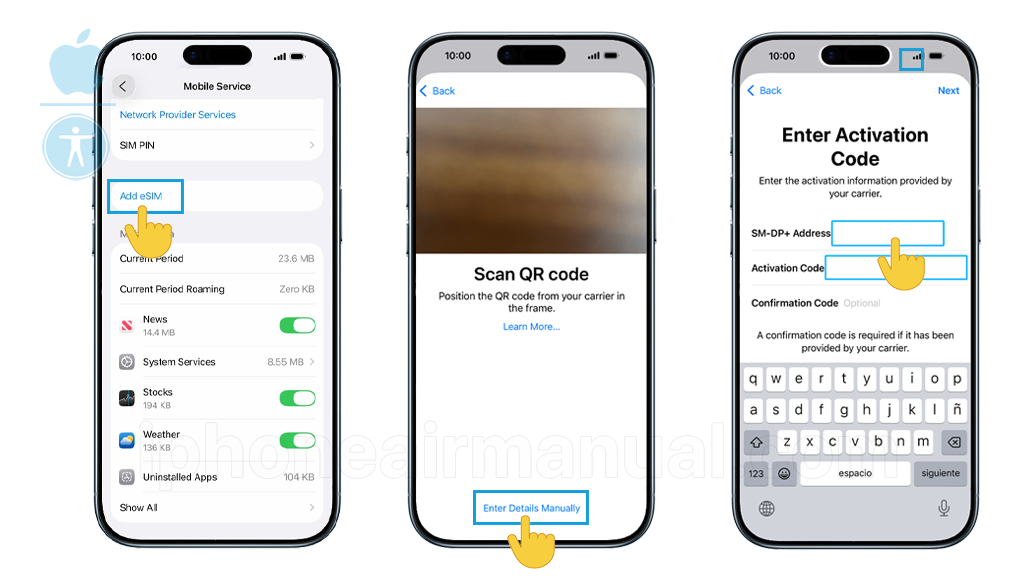
- Choose “Enter Details Manually” at the bottom of the screen.
- Enter the required information:
- SM-DP+ Address: The server address provided by your carrier.
- Activation Code: The unique code for your eSIM profile.
- Confirmation Code: Leave blank unless specified by your carrier.
- Tap “Next” and follow the onscreen instructions to complete installation.
These methods cover standard carrier plans, travel eSIMs, and number transfers, and are compatible with all regions and major carriers for iPhone Air.
How to Transfer eSIM from Another iPhone
For users upgrading from another iPhone, eSIM Quick Transfer offers the most convenient way to move your existing cellular plan to your iPhone Air.
Requirements for Quick Transfer:
- Both devices are signed into the same Apple account.
- Previous iPhone unlocked with device passcode.
- Both devices nearby with Bluetooth enabled.
Transfer Process:
- During iPhone Air setup, when prompted to transfer your phone number, follow the onscreen instructions.
- Select the cellular plan you want to transfer from your previous iPhone.
- Follow instructions on both devices to confirm the transfer.
- Wait for activation; your previous SIM will be deactivated when the new eSIM activates.
Post-Setup Transfer:
- Go to Settings > Cellular > Setup Cellular or “Add eSIM.”
- Choose a cellular plan to transfer from another iPhone.
- Tap “Transfer From Nearby iPhone” if you don’t see a list of numbers.
- Follow the confirmation steps on your previous iPhone.
- Enter verification code if prompted.
Setting Up Dual eSIM on iPhone Air
The iPhone Air’s dual eSIM capability allows you to maintain two active cellular plans simultaneously, perfect for separating work and personal lines or adding travel data plans.
Configuring Dual eSIM:
- Add your first eSIM using any of the methods above.
- Navigate to Settings > Cellular.
- Tap “Add Cellular Plan” to install a second eSIM.
- Follow the same activation process for your second carrier.
- Label your lines (e.g., “Personal,” “Business,” “Travel”) for easy identification.
- Configure default settings for calls, messages, and data usage.
Troubleshooting Common eSIM Issues
Despite the streamlined process, you may occasionally encounter activation challenges. Here are solutions to common problems:
eSIM Stuck on “Activating”:
- Check your location: Travel eSIMs only activate when you reach your destination country.
- Verify network coverage: Ensure you’re within your carrier’s coverage area.
- Restart your iPhone: A simple reboot often resolves temporary glitches.
Activation Failure:
- Verify QR code validity: Ensure the code isn’t damaged or expired.
- Check carrier compatibility: Confirm your carrier supports eSIM for iPhone Air.
- Update iOS: Install the latest software version to resolve compatibility issues.
Network Connection Problems:
- Enable data roaming: Required for international eSIM plans.
- Reset Network Settings: Go to Settings > General > Reset > Reset Network Settings.
- Check APN settings: Some carriers require manual APN configuration.
Managing Your iPhone Air eSIM
Once activated, you can easily manage your eSIM settings:
Switching Between eSIMs:
- Go to Settings > Cellular.
- Tap the eSIM you want to modify.
- Toggle “Turn On This Line” to activate or deactivate.
Setting Data Preferences:
- Navigate to Settings > Cellular > Cellular Data.
- Select your preferred eSIM for data usage.
- Configure automatic switching if desired.
Removing an eSIM:
- Go to Settings > Cellular.
- Select the eSIM you want to remove.
- Tap “Remove Cellular Plan.”
Supporting Tips
- If you encounter any errors during installation, restart the device and retry the process.
- Deleting an eSIM profile is permanent. You’ll need to contact your carrier to get a new eSIM QR code if you delete it accidentally.
Carrier Compatibility and Global Support
The iPhone Air’s eSIM technology is supported by over 500 carriers worldwide, including major providers like AT&T, T-Mobile, and Verizon, and international carriers across Europe, Asia, and other regions. Before purchasing your iPhone Air, verify that your local carrier supports eSIM activation to ensure seamless connectivity.
Enjoy Effortless Connectivity
Setting up eSIM on the iPhone Air is about simplicity, speed, and freedom. With these steps, enjoy a smart start to seamless mobile service—no physical SIMs needed!